Clixon
Introduction
Clixon can generate a server from a YANG data model.
The generated server provides multiple north-bound interfaces based on the YANG data model:
- A command line interface (CLI).
- A NETCONF interface.
- A RESTCONF interface.
Clixon also provides a software development kit (SDK) that allows you to develop plugins that implement the backend of the YANG data model, such as:
- Retrieve the values for operational attributes from the underlying hardware when a NETCONF get / RESTCONF get / CLI show operation is performed.
- Make the values for configuration attributes take effect in the underlying hardware when a NETCONF set / RESTCONF put / CLI set operation is performed.
The following figure shows the clixon architecture:
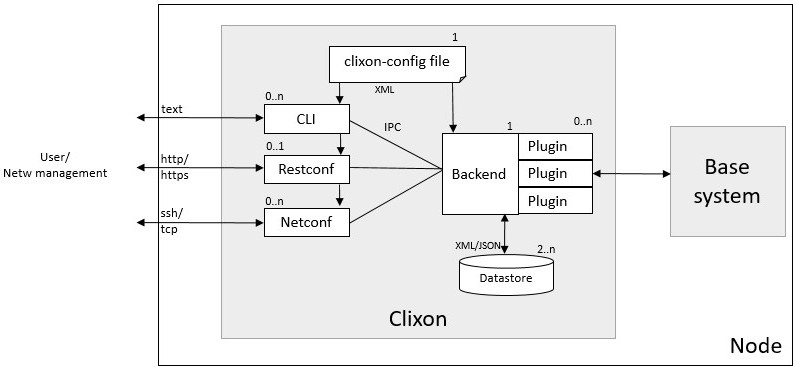
Clixon is an open source project implemented in C. You can think of Clixon as being the open source equivalent of the commercial CONFD product from Tail-F or the YumaPro product suite from YumaWorks.
Install clixon
Clixon is an open source project written in C that offers a YANG-based configuration data store with plugin APIs for configuration consuming applications and with CLI, NETCONF, and RESTCONF frontend interfaces.
Install the dependencies for clixon:
$ sudo apt-get install flex bison
Add clixon and clicon user groups and add users to them
(replace _
$ sudo useradd -M -U clixon
$ sudo usermod -a -G clixon <your-user-name>
$ sudo usermod -a -G clixon www-data
$ sudo useradd -M -U clicon
$ sudo usermod -a -G clicon <your-user-name>
$ sudo usermod -a -G clicon www-data
Log out and log in again, to make the new user group settings take effect.
Clone, build, and install the cligen GitHub repository:
$ cd ~
$ git clone https://github.com/clicon/cligen.git
$ cd cligen
$ ./configure
$ make
$ sudo make install
Clone, build, and install the clixon GitHub repository:
$ cd ~
$ git clone https://github.com/clicon/clixon.git
$ cd clixon
$ ./configure
$ make
$ sudo make install
We will explain how to start the clixon backend server and the clixon frontend servers for the CLI, for NETCONF, and for RESTCONF in the main body of the tutorial.
Build the clixon backend server
We will now explain how to build the clixon backend server for the interfaces.yang data model
that we introduced earlier in this tutorial.
First install clixon following the clixon installation instructions at the end of this tutorial.
Change the current directory to the clixon directory in this repository:
$ cd ~/yang-tutorial/clixon
This directory contains the following:
$ ls -1
interfaces_cli.cli
interfaces.xml
Makefile
plugins/
startup_db
These files have the following functions:
- File
interfaces.xmlis the the configuration file for the Clixon backend daemon. - File
interfaces_cli.cliis the configuration file for the Clixon CLI daemon. - File
startup_dbcontains startup configuration datastore. - Directory
pluginscontains tutorial code for the backend plugins (we will get to this later). - File
Makefilecontains the rules for building and installing Clixon.
We will first run clixon without any plugins.
Since there are no plugins yet, we don’t have to compile any code.
For now, the only thing we have to do is to install the clixon configuration files in the proper
directories.
This is achieved by running make install as a super user:
$ sudo make install
install -d -m 0755 /usr/local/etc
install -m 0644 interfaces.xml /usr/local/etc
install -d -m 0755 /usr/local/lib/interfaces
install -d -m 0755 /usr/local/lib/interfaces/clispec
install -m 0644 interfaces_cli.cli /usr/local/lib/interfaces/clispec
install -d -m 0755 /usr/local/var
install -d -m 0755 /usr/local/var/interfaces
install -m 0644 startup_db /usr/local/var/interfaces/
install -d -m 0755 /usr/local/share/clixon
install -m 0644 ../interfaces.yang /usr/local/share/clixon
Start the clixon backend server daemon
Start the clixon backend daemon. The minimal command to start the clixon server is:
$ sudo clixon_backend -f interfaces.xml
I typically set the debug level to one (-D 1) and write the output to a log file:
$ sudo clixon_backend -f interfaces.xml -lf/var/log/clixon.log -D 1
And then I typically monitor the log file in a separate terminal window:
$ tail -f /var/log/clixon.log
To verify that the clixon backend daemon is actually running:
$ ps aux | grep clixon
root       47277  0.0  0.0   4596  3388 ?        Ss   15:27   0:00 clixon_backend -f interfaces.xml
paralle+   47504  0.0  0.0   9040   740 pts/0    S+   15:28   0:00 grep --color=auto clixon
If you ever want to restart the clixon backend daemon, you first have to stop the old daemon first
using the -z command line option (don’t do this now):
$ sudo clixon_backend -f interfaces.xml -z
Mar 16 15:50:42: Killing old daemon with pid: 47277
Start the clixon CLI frontend
Start the clixon command line interface (CLI) frontend:
$ clixon_cli -f interfaces.xml
cli>
Use the clixon CLI
The cli> prompt indicates that we are now in the clixon CLI that was automatically generated from
interfaces.yang data model in combination with the interfaces_cli.cli configuration file.
Type ? to get a list of available CLI commands:
cli> ?
  commit                Commit the changes
  compare               Compare running and candidate
  create                Create a configuration item
  debug                 Debugging parts of the system
  delete                Delete a configuration item
  discard               Discard edits (rollback 0)
  load                  Load configuration from XML file
  merge                 Merge configuration items
  mode                  Enter a configuration mode
  no                    Negate or remove
  quit                  Quit
  save                  Save candidate configuration to XML file
  set                   Set a configuration item value
  show                  Show a particular state of the system
  startup               Store running as startup config
  top                   Move to the top level in the configuration
  up                    Move one level up in the configuration
  validate              Validate changes
cli>
If we do a show configuration at this point, we get no output because we have not yet configured
any interfaces:
cli> show configuration
cli>
Configure IPv4 address 10.0.0.99 on the loopback interface lo:
cli> set interfaces interface lo ipv4-address 10.0.0.99
cli>
The configuration that we just added has not yet taken effect: at this point it is just a candidate configuration and not yet a running configuration.
Use the commit command to make the configuration take effect, in other words to make the candidate configuration the running configuration (later, when we implement the backend plugin we will see that committing the configuration causes the IPv4 address on the real interface to change):
cli> commit
cli>
If you try to configure some attribute that is not defined in the YANG data model
(ipv6-address in this example),
you get an error. This is the simplest example of configuration validation based on the YANG data model:
cli> set interfaces interface lo ipv6-address ::10
CLI syntax error: "set interfaces interface lo ipv6-address ::10": Unknown command
If you try to configure an invalid IPv4 address, you also get an error.
cli> set interfaces interface lo ipv4-address ::10
CLI syntax error: "set interfaces interface lo ipv4-address ::10": "::10" is invalid input for cli command: ipv4-address
This is more sophisticated example of configuration validation based on the YANG data model.
In this example, the invalid IPv4 address ::10 is rejected by the CLI because it does not match
the regular expression in the YANG data model:
leaf ipv4-address {
    type string {
        pattern
          '(([0-9]|[1-9][0-9]|1[0-9][0-9]|2[0-4][0-9]|25[0-5])\.){3}'
        + '([0-9]|[1-9][0-9]|1[0-9][0-9]|2[0-4][0-9]|25[0-5])';
    }
    description
      "The IPv4 address of the interface.";
}
Now configure the IPv4 address of a second interface eth0.
In this case, instead of specifying the full path of the configured attribute in the set command,
we navigate to the desired attribute using the mode command:
cli> mode interfaces
cli> mode interface
cli> mode eth0
cli> set ipv4-address 10.0.0.98
cli>
In addition to the mode command, we can also use the up and top commands to navigate through
the levels in the configuration hierarchy:
cli> set ?
  ipv4-address          The IPv4 address of the interface.
cli> up
cli> set ?
  interface             The list of interfaces on the device.
cli> top
cli> set ?
  interfaces            Interface parameters.
Recall that we have only added this second interface to the candidate configuration; not yet to the running configuration.
Before we commit, we can use the compare command to see what the difference is between the
candidate configuration and the running configuration, in other words which configuration changes
have not yet been committed:
cli> compare
     interface {
+        name eth0;
+        ipv4-address 10.0.0.98;
+    }
+    interface {
         name lo;
Note that the comparison looks a bit strange, because the diff algorithm in clixon does a simple
text comparison which doesn’t understand whether the first interface { line or the second
interface { line was added.
Now commit the candidate configuration:
cli> commit
cli>
Now, when we do show configuration we see both configured interfaces:
cli> show configuration
interfaces {
    interface {
        name eth0;
        ipv4-address 10.0.0.98;
    }
    interface {
        name lo;
        ipv4-address 10.0.0.99;
    }
}
cli>
We can also look at the configuration other formats such as XML or JSON:
cli> show configuration xml
<interfaces xmlns="http://remoteautonomy.com/yang-schemas/interfaces">
   <interface>
      <name>eth0</name>
      <ipv4-address>10.0.0.98</ipv4-address>
   </interface>
   <interface>
      <name>lo</name>
      <ipv4-address>10.0.0.99</ipv4-address>
   </interface>
</interfaces>
</pre>
cli> show configuration json
{
  "ietf-restconf:data": {
    "interfaces:interfaces": {
      "interface": [
        {
          "name": "eth0",
          "ipv4-address": "10.0.0.98"
        },
        {
          "name": "lo",
          "ipv4-address": "10.0.0.99"
        }
      ]
    }
  }
}
Use the quit command to exit the CLI and return to the Linux shell:
cli> quit
$
Implement a clixon plugin
Clixon has the concept of plugins. The responsibilities of a plugin include:
-
Validate changes to the data store before they are committed. Many constraints can be expressed in the YANG data model and can be validated by the clixon backend server without having to manually write any code. For example, the
ipv4-addressattribute in our data model enforces that the IPv4 address has the correct format by using thepatternoption and a regular expression. Other constraints cannot be expressed in YANG and those constraints are validated by the plugin. In this tutorial we will enforce the (silly) constraint that there cannot be more than two interfaces starting with the letter x. -
After each commit that passed the validation phase, process all configuration changes and make them take effect on the underlying hardware platform. In our example, when the user adds a new interface with an IPv4 address, the plugin must interact with the TCP/IP stack to add the IPv4 address. Or when the user modifies the IPv4 address of an existing interface in the data store, the plugin must correspondingly modify the IPv4 address of the corresponding interface in the TCP/IP stack. Or when the user deletes an interface from the data store, the plugin must interact with the TCP/IP stack to remove the IPv4 address from the corresponding interface.
-
When the user retrieves the value of an operational attribute (e.g. using a
showcommand the CLI), the plugin must provide the requested value. For example, when the value of thesent-packetsattribute in the YANG data model is requested, the plugin must retrieve the corresponding counter from the TCP/IP stack.
We will now implemented a fake plugin. It is fake in the sense that it will just swallow any configured IPv4 address without applying it to a real interface, and it will just return random values for the packet counters instead of reading the real counters from the real interfaces. Later, we will convert the fake plugin with a real plugin that configures and reads the real interfaces. But for now, we start simple and focus on the APIs provided by clixon.
TODO: Get rid of the ‘fake’ terminology.
The file interfaces_fake_plugin.c contains the code for our fake plugin.
We will now walk through the code to explain how it works.
The first thing we have to do is to register our plugin and its callback functions:
TODO: write code first
We register callbacks for validation (ca_trans_validate) and for commit (ca_trans_commit).
We also register callbacks for the beginning of a transaction (ca_trans_begin) and the end
of a transaction (ca_trans_end).
We don’t do anything in these callbacks, but it is necessary to register for them anyway,
otherwise the validation and commit callback won’t get called.
There are additional callbacks that one can register for
including, ca_trans_complete, ca_trans_commit_done, ca_trans_revert, and ca_trans_abort.